A malfunctioning latch on a lid can be a source of constant frustration, whether it’s on a storage box, a kitchen appliance, or even a tool case. From keeping contents secure to ensuring proper operation, a functional latch is crucial. Fortunately, many common latch problems can be resolved with a few basic tools and a bit of patience, saving you the expense of professional repair or a complete replacement. This guide will walk you through diagnosing common issues, assembling your toolkit, and performing step-by-step repairs for various types of broken lid latches.
Understanding Common Latch Types
Latches come in a wide array of designs, each suited for specific applications and levels of security. Understanding the type of latch you’re dealing with is the first step toward a successful repair.
Spring Latches
|
Our Picks for the Best Rice cooker in 2026
As an Amazon Associate I earn from qualifying purchases.
|
||
| Num | Product | Action |
|---|---|---|
| 1 | GreenLife Rice Cooker with Removable PFAS-Free Ceramic Nonstick Pot, 3-Cups Uncooked/6-Cups Cooked, Grains & Oatmeal Multicooker, Compact One-Switch Design, Auto Keep Warm, Easy Clean, Cream |

|
| 2 | Elite Gourmet Electric Rice Cooker with Steam Tray and Non-Stick Inner Pot Makes Soups, Stews, Grains, Cereals, Keep Warm Feature, 6 Cups Cooked (3 Cups Uncooked), Black |
|
| 3 | Zojirushi NS-TSC10 5-1/2-Cup (Uncooked) Micom Rice Cooker and Warmer, 1.0-Liter |
|
| 4 | COSORI Rice Cooker 10 Cup, 24h Keep Warm, Non-stick Ceramic Inner Pot, 18 Functions Fuzzy Logic Rice Maker with Stainless Steel Steamer Basket, Sauté, Slow Cooker, Black |
|
| 5 | Aroma Housewares Professional Plus ARC-5000SB 20 Cup (Cooked) Digital Rice Cooker, Food Steamer, Slow Cooker, Stainless Exterior/Nonstick Pot, Silver, Black, 10-cup uncooked/20-cup cooked/4QT |
|
| 6 | AROMA® Rice Cooker, 3-Cup (Uncooked) / 6-Cup (Cooked), Small Rice Cooker, Oatmeal Cooker, Soup Maker, Auto Keep Warm, 1.5 Qt, White, ARC-363NG |
|
| 7 | BLACK+DECKER 16-Cup Rice Cooker, RC516, 8-Cup Uncooked Rice, Steaming Basket, Removable Non-Stick Bowl, One Touch |
|
| 8 | Dash Mini Ceramic Rice Cooker - Designed for Single-Serve Cooking - Compact Rice Cooker with Nonstick Removable Pot, Keep Warm Function & Easy-to-Clean Sleek Design - Black Ceramic |
|
| 9 | Elite Gourmet ERC006SS 6-Cup Electric Rice Cooker with Stainless Steel Inner Pot, Makes Soups, Stews, Porridges, Grains and Cereals, 6 cup (3 cups uncooked), Black |
|
| 10 | Aroma Housewares ARC-994SB Rice & Grain Cooker Slow Cook, Steam, Oatmeal, Risotto, 8-cup cooked/4-cup uncooked/2Qt, Stainless Steel |
|
Often found on cabinet doors or lightweight containers, spring latches feature a spring-loaded bolt that retracts when activated and springs back to secure the lid. They are simple but can suffer from spring fatigue or alignment issues.
Sliding or Bolt Latches
These latches use a simple sliding bolt to secure a lid or door, commonly seen on gates, sheds, or some utility boxes. They rely on friction and a secure mounting for effective closure.
Draw or Toggle Latches
Known for their strong closing force, draw latches (also called toggle latches) pull two surfaces together using a lever and a catch. They are frequently used on toolboxes, shipping containers, and rugged cases where a tight seal is needed.
Cam Latches
Cam latches are operated by a quarter-turn motion that rotates a cam behind the lid’s frame, securing it. Compression latches are a variation designed to compress a gasket, providing a tight, sealed closure, often found on electrical enclosures.
Magnetic Catches
These latches use magnets to hold a lid or door closed, offering a sleek, quiet operation. They are common in kitchen cabinets and lighter enclosures where a visible latch isn’t desired. While not strictly “broken” in the mechanical sense, their magnetic force can weaken over time or through misalignment.
Common Causes of Latch Failure
Identifying why your latch broke is key to selecting the right repair strategy. Latch failures typically stem from a few common issues:
- Loose or Stripped Screws: Over time, screws can loosen due to vibrations, frequent use, or improper installation, causing the latch components to shift or detach. Stripped screw holes prevent screws from tightening securely.
- Misalignment: If the latch mechanism or the strike plate (the part the latch engages with) shifts, they may no longer align correctly, preventing the lid from securing properly.
- Wear and Tear: Constant use can lead to material fatigue. Springs lose tension, plastic components can become brittle and snap, and metal parts may bend or wear down, particularly at pivot points or engaging surfaces.
- Dirt, Grime, or Corrosion: Accumulations of debris, dust, or rust can impede the smooth operation of moving parts within the latch, causing it to stick or become difficult to engage.
- Impact Damage or Breakage: Accidental drops, forceful closing, or external impact can cause plastic parts to crack or snap, or metal components to deform beyond their functional shape.
Essential Tools for Latch Repair
Having the right tools on hand will make your repair project go much more smoothly. Most latch repairs only require a few common items:
- Screwdriver Set: You’ll likely need Phillips and flathead screwdrivers. Some modern latches may require Torx bits.
- Pliers: Needle-nose pliers are excellent for handling small springs or pins, while regular pliers can help with bending small metal components.
- Lubricant Spray: A silicone-based lubricant or a multi-purpose oil like WD-40 can help free sticking mechanisms and reduce friction.
- Wood Glue and Toothpicks/Wooden Dowels: Essential for repairing stripped screw holes in wood or particleboard.
- Small Brush or Cotton Swabs: For cleaning dirt and grime from tight spaces.
- Utility Knife: Useful for scraping away old adhesive or trimming plastic.
- Optional but Recommended: A small file or sandpaper for smoothing rough edges, a drill with various bits, epoxy adhesive for plastic breaks, and replacement parts if a component is beyond repair.
Step-by-Step Latch Repair Guide
Before starting any repair, always prioritize safety. If the lid is part of an electrical appliance, unplug it first. Consider wearing safety goggles to protect your eyes from debris or flying springs.
1. Diagnose the Problem
Begin by thoroughly examining the latch. Open and close the lid several times, observing where the failure occurs. Is the latch bolt not extending, not retracting, or not engaging the strike plate? Are screws loose? Is there visible damage to plastic or metal components? Does it feel gritty or sticky?
2. Fix Loose or Stripped Screws
- Tighten Existing Screws: Use the appropriate screwdriver to gently tighten any visible screws on the latch assembly and the strike plate. Be careful not to overtighten, especially on plastic, as this can strip the holes further.
- Repair Stripped Screw Holes: If a screw spins freely and won’t tighten, the hole is likely stripped.
- Remove the screw.
- Insert a few wooden toothpicks or a small wooden dowel into the hole, along with a drop of wood glue. Break off any excess toothpick flush with the surface.
- Allow the glue to dry completely (check the product’s instructions, usually a few hours).
- Once dry, reinsert the screw. The glue-filled hole will provide new material for the screw threads to grip.
- Consider Longer/Wider Screws: For persistent issues with stripped holes, especially in denser materials, slightly longer or wider screws (of the same thread type) can sometimes provide a better grip.
3. Address Misalignment
- Adjust Strike Plate Position: If the latch bolt isn’t lining up with the strike plate, it may need adjustment.
- Loosen the screws holding the strike plate.
- Carefully shift the strike plate slightly in the necessary direction (up, down, left, or right).
- Test the latch operation. Once it engages smoothly, tighten the screws. You might need to mark the old position with a pencil first to avoid over-adjusting.
- Gently Bend Components: For minor misalignment in metal latches (e.g., a slightly bent catch), you might be able to use pliers to gently bend the component back into its correct position. Exercise caution to avoid breaking the metal.
4. Clean and Lubricate Sticking Latches
- Disassemble (If Possible): For internal mechanisms, you might need to partially disassemble the latch to access the moving parts. Take photos as you go to remember how to reassemble it.
- Clean Thoroughly: Use a small brush, cotton swab, or even compressed air to remove any dirt, dust, or grime that has accumulated within the mechanism. For stubborn grime, a degreaser or alcohol can be effective, but ensure it won’t damage plastic components.
- Apply Lubricant: Once clean, apply a small amount of silicone spray or light machine oil to the moving parts, springs, and pivot points. Operate the latch several times to work the lubricant into the mechanism. Wipe away any excess.
5. Repairing Broken Plastic Components
Plastic latches are common but prone to snapping. Repairs can be temporary or more robust, depending on the damage.
- Super Glue for Small Cracks: For hairline cracks or small, non-load-bearing breaks, super glue (cyanoacrylate adhesive) can offer a quick fix. Ensure surfaces are clean and dry, apply a tiny amount, and hold firmly until set.
- Epoxy for Stronger Bonds: For more significant breaks or parts that bear some load, a two-part epoxy adhesive provides a much stronger bond. Mix according to instructions, apply to both surfaces, and clamp together until fully cured. Epoxy can also be used to fill small missing pieces.
- Reinforcement: For critical plastic parts, consider reinforcing the repair. A small metal plate or even a strong zip tie could be used to brace the repaired area, especially on draw latches or handles that undergo stress.
- When to Replace: If the plastic piece is completely shattered, heavily worn, or under significant stress, replacement is usually the most reliable solution. Many appliance latches are available as inexpensive spare parts.
6. Replacing a Damaged Latch Mechanism
Sometimes, repair isn’t feasible, and full replacement is necessary. This is often the case for complex mechanisms, deeply fatigued springs, or when a part is completely broken and cannot be glued.
- Source the Correct Part: Look for the make, model, and serial number of the item the lid belongs to. Appliance parts websites or the manufacturer’s customer service are good starting points. Ensure the replacement part is identical.
- Removal: Carefully remove all screws holding the old latch in place. Note how any springs or other small components are positioned before removing them.
- Installation: Position the new latch mechanism, ensuring all springs and internal components are correctly aligned. Secure it with the original screws (or new ones if the old ones are damaged). Test the functionality thoroughly before declaring the job complete.
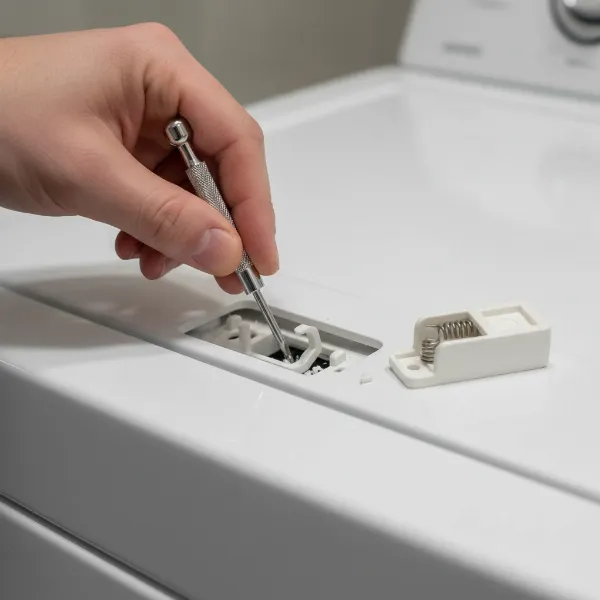 A close-up shot of a hand replacing a broken latch mechanism on a washing machine lid.
When to Call a Professional (or Replace the Item)
While many latch repairs are DIY-friendly, some situations warrant professional help or considering a new item altogether.
- Complex Electrical Components: If the latch is part of a complex system with integrated electronics, such as a smart lock or an appliance safety interlock, it’s best to consult a professional to avoid further damage or safety hazards.
- Structural Damage to the Lid/Door: If the lid itself is severely cracked, warped, or corroded at the latch mounting points, simply repairing the latch won’t solve the underlying problem. The lid may need professional repair or replacement.
- Lack of Specific Tools or Expertise: Some latches require specialized tools or knowledge of intricate mechanisms. If you feel uncomfortable or lack the right equipment, a professional can often complete the job safely and efficiently.
- Cost of Repair Outweighs Replacement: For older, inexpensive items, the cost of a replacement latch part or professional repair might exceed the value of the item itself. In such cases, purchasing a new item might be a more economical choice.
Maintenance Tips to Prevent Future Latch Issues
Preventative maintenance can significantly extend the life of your latches and save you from future repairs.
- Regular Cleaning: Periodically wipe down latches and surrounding areas to prevent the buildup of dust, dirt, or grease that can hinder their operation.
- Periodic Lubrication: Apply a suitable lubricant to moving parts every few months, especially for latches on outdoor items or those used frequently. This reduces friction and wear.
- Gentle Handling: Avoid slamming lids or forcing latches. Gentle and deliberate operation reduces stress on the components.
- Timely Tightening of Screws: Check mounting screws periodically and tighten them if they feel loose. Addressing looseness early can prevent misalignment and further damage.
Conclusion
A broken latch doesn’t have to mean the end for your favorite storage container, appliance, or toolbox. By understanding the common types of latches, diagnosing the root cause of the problem, and applying the right repair techniques, you can often restore full functionality with minimal effort and cost. From tightening a loose screw to carefully replacing a broken plastic component, many lid latch repairs are well within the grasp of the average DIY enthusiast. Remember to always prioritize safety and consider when a professional touch or a new item might be the more practical solution.
What kind of lid latch problem are you currently facing? Knowing the specific issue can often guide you directly to the simplest, most effective fix.
Frequently Asked Questions
Can I use super glue for a broken plastic latch?
Super glue can work for small, clean breaks or hairline cracks in plastic latches. However, for parts that experience significant stress or load, a two-part epoxy adhesive will provide a much stronger and more durable bond.
How do I know if I need to replace the entire latch?
You should consider replacing the entire latch if multiple components are severely broken, if a critical internal spring is missing or fatigued beyond repair, or if the cost and effort of repairing individual parts become impractical. Often, complete replacement latches are available as spare parts and can be easier to install than attempting a complex repair.
What kind of lubricant should I use for a sticky latch?
For most latches, a silicone-based spray lubricant or a light machine oil (like 3-in-One oil) is effective. Avoid heavy greases that can attract dirt. For door latches, graphite powder can also be a good, clean option. Always ensure the lubricant is appropriate for the materials of your latch to avoid damage, especially with plastics.